Would you believe me if I said you could optimise your Pinterest marketing workflow as well as create the most gorgeous pin designs in minutes using Tailwind Create?
Read my Tailwind Create review and find out how you can also create beautiful and engaging pins super-fast!
More...
[Disclaimer: Some links in this post contain affiliate links. This means I get a commission if you purchase the product through my link at no extra cost to you. As an Amazon Affiliate I earn from qualifying purchases.]
We're not all born with a creativity muse on our shoulder.
So you might feel like you don't really know how to use the colours you've chosen for your branding, or that you don't have a clue about design principles or what works and what doesn't.
And then you spend hours trying to come to grips with your graphic design program.
Some of them are easy, it's true, but others have a steep learning curve and you're too busy to spend the time learning how they work.
So you end up looking at your pins and feeling underwhelmed and wish you hadn't wasted so much time creating them.
Pin it for later?
Busy? Why not Pin it for later?
Thank you!
The problem with your Pinterest content creation process:
You write your blog post, craft tutorial, yummy recipe or create your brand new product. You've done all your SEO work, proof-read and edited the text, etc.
Now you add your images to your web content.
They can be screenshots you've already taken, photos you've taken yourself, an infographic or even a short video.
If you don't have your own photos, using stock photos will give your content a professional look. Check out IvoryMix and Pixistock for feminine photos and DepositPhotos for male and female niches.
Creating your pins without tailwind create
So now you have your photos, you have to upload them to your graphic design program. And it's time to create a few Pins for your new content.
But since you're not so great at designing, you choose some templates you see in your graphic design program and start adapting them by changing your fonts, your colours...
But things don't quite work with the images you have or the words you have, so you're fiddling with colours, layers, shapes, adding arrow and other elements...
And by the time you finished you've spent hours doing them.

Photo by Jeshoots
OK, finally! You've got your images, so it's time to download them again to your computer so you can start sharing them on Pinterest.
So let's recap:
Every time you have some new content you spend hours finding or taking photos, designing pins, uploading and downloading files from one app to another, and uploading them again to Tailwind before you can schedule them and share them to your Tribes.
And then you have to do it all again for every new piece of content you create.
And what about creating new pins for older content?
You don't want to spend hours doing that either!
the solution: tailwind create
There is one tool you can use to create and schedule high-quality images much more quickly and easily, and it's Tailwind Create.
If you're not using Tailwind yet, click here to start using it for FREE.
Let me show you how to use Tailwind Create now:
Add some Magic to your Pinterest marketing workflow
Now imagine you could wave a magic wand and create and schedule multiple designer-quality pins in minutes. Just like that.
And what if I told you you don't need to be Hermione Granger to do this?
But instead of a magic wand, you can use Tailwind Create.
What is Tailwind Create
Tailwind Create is a new tool created by Tailwind that creates multiple high-quality pin designs for you in seconds. Then you spend a few minutes editing a few pins you like and you can schedule them straight from Tailwind.
If you're still not using Tailwind to schedule your pins, sign up here before you can get access to Tailwind Create.
HOW TO USE TAILWIND CREATE
Before I tell you how it works, I must say that it's still a bit glitchy at times.
But even if there is still the odd issue every now and then, it's a must-have tool for you if you're creatively challenged.
Because it's super-easy to use.
STEP 1
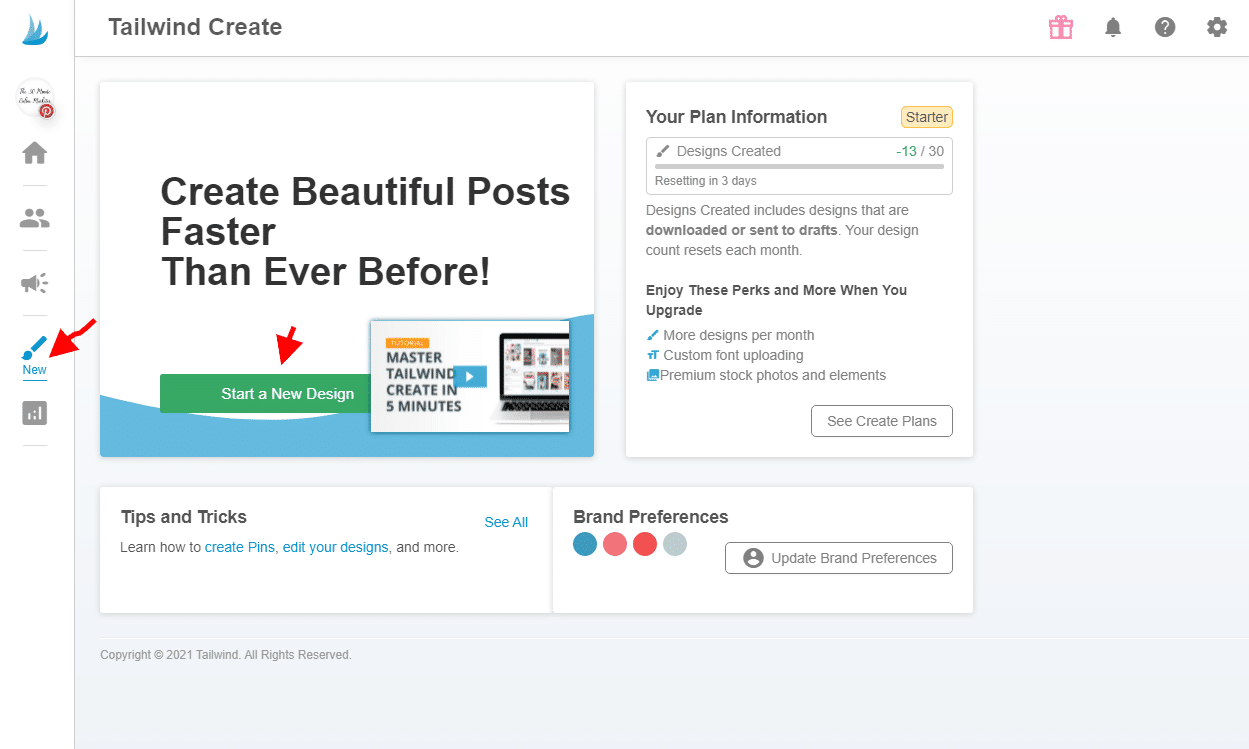
To create your pin designs with Tailwind Create, click on the brush tab and then click on Start a New Design.
STEP 2
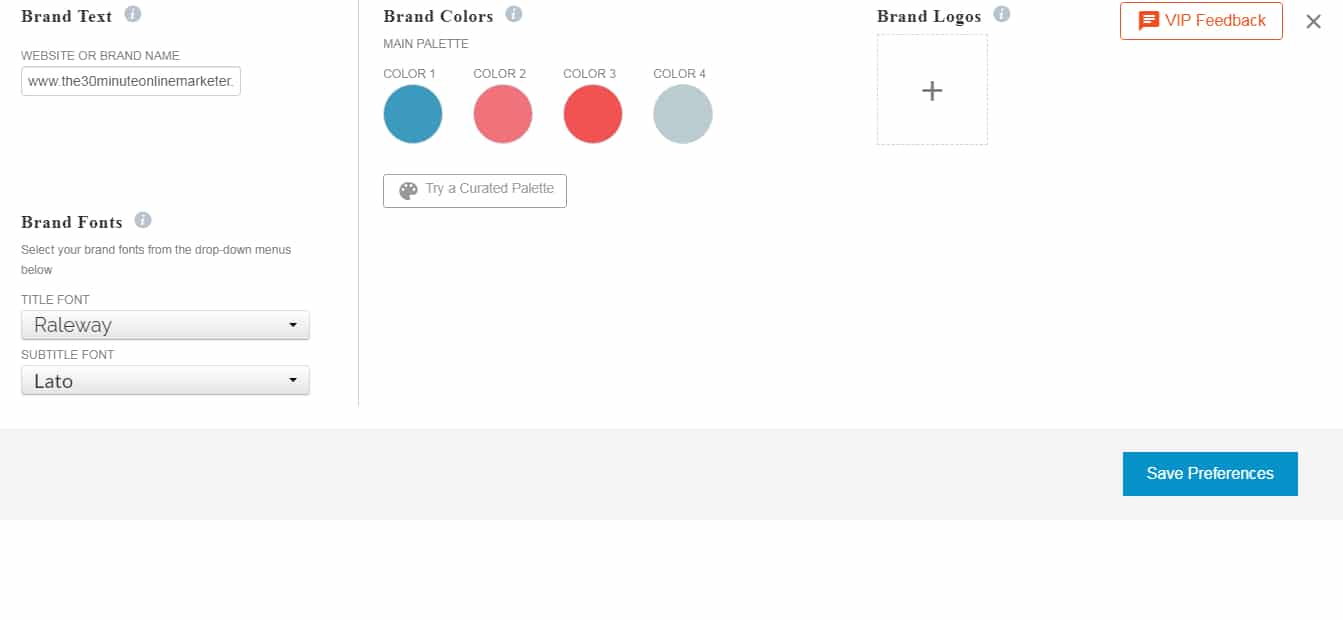
If this is the first time you've done it, you'll need to add your URL, your logo (if you wish), add a few colours from your palette and a couple of your fonts.
STEP 3
You can now start creating Pins for your content by adding the URL of the blog post you want to use.
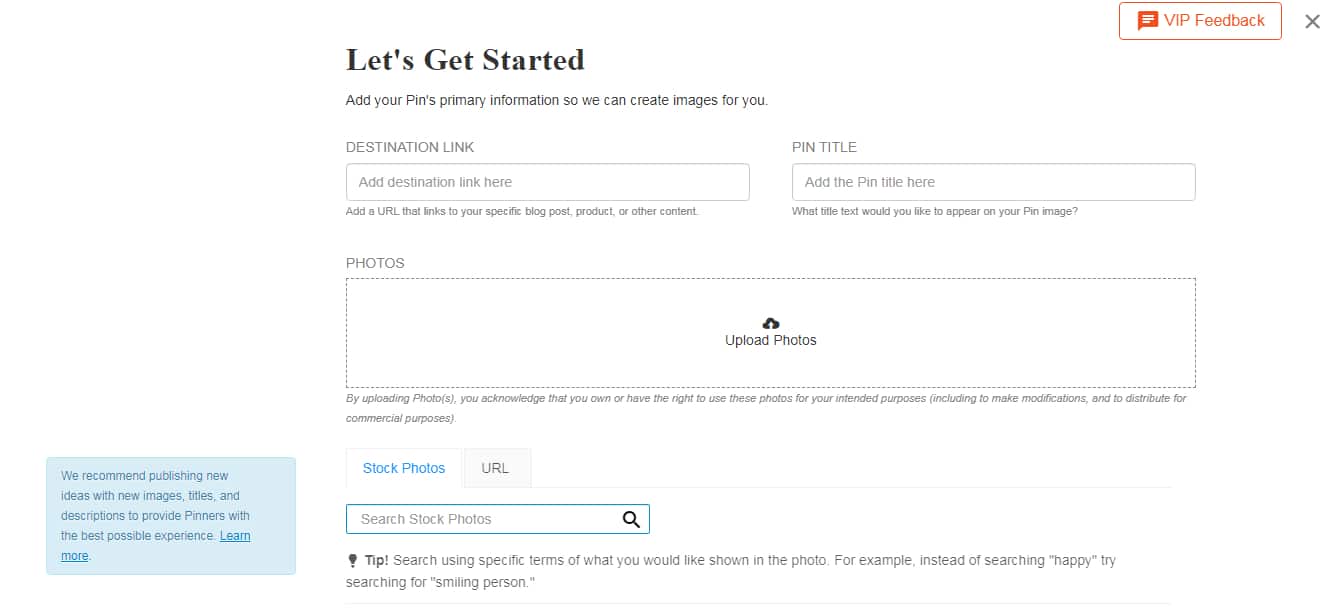
When you add your content's URL Tailwind Create pulls the title from your blog post, but you can type a different title if that's what you want. It also pulls any images you might have included in your content. If you want to use them, click on them.
If you want to add some other image, you can either upload images you've already got or search for FREE stock photos, like I did in this example.
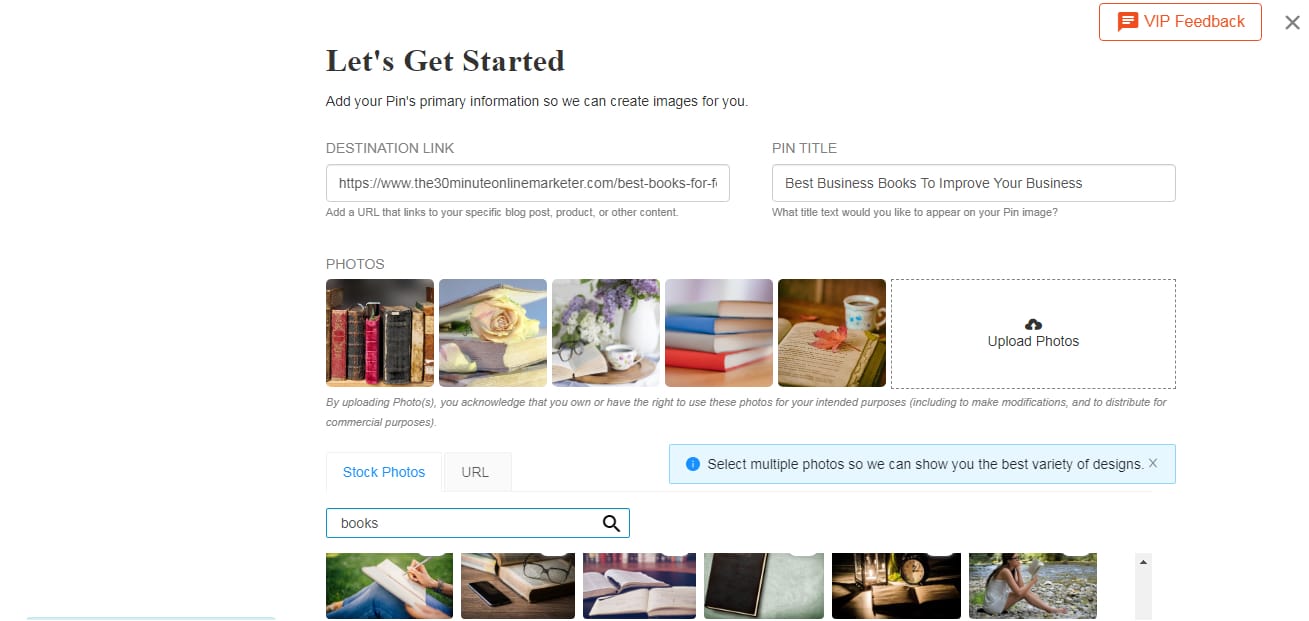
They don't quite work for my brand colours, but I just wanted you to see that you can do it.
Step 4
Now you have a lot of beautiful pin designs created by Tailwind Create.
And what you need to do next is choose the right ones for you. So filter the results according to Content, Promotion, Industry, Style or Season.
Here's an example using a different blog post and some photos I uploaded from my Ivorymix membership.
The next step is to add a few changes to your designs if they need it.
It's so easy!
Step 5
To customise a Tailwind Create design and make it your own, you can do this by Re-Styling the Pin by changing the Photos, the Colour Palettes and even the Layout.
But if that's not enough for you and you're still not happy, you can also edit each individual design by clicking on Edit, so you can change fonts, photos and move things around a bit.
One thing I also like is being able to use your own brand colours or get different colour palettes based on the images you're using.
Worth trying if you have a craft or food blog!
Step 6
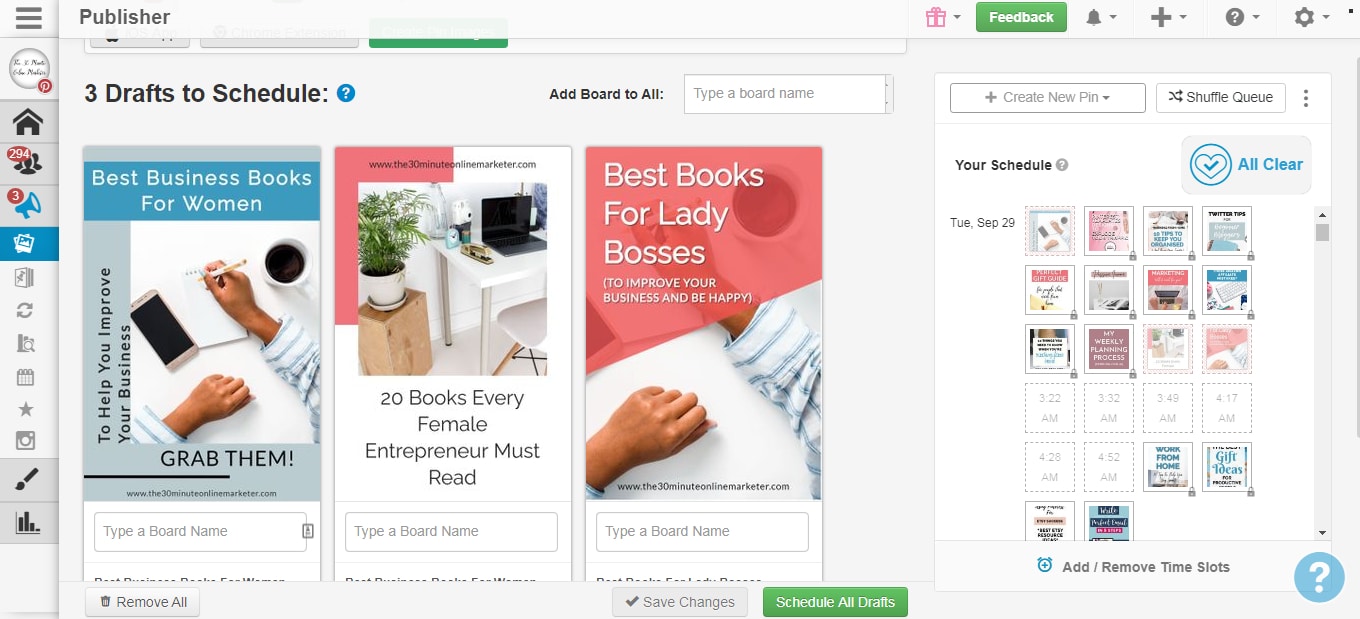
You will see all the pins you've selected. Click the Go Schedule button to send your pins to draft.

Step 7
Now you schedule your pins as usual, add your boards, make sure they all have a pin description, set the interval to leave for pinning to the next board and schedule your pins t your own boards or share some of the designs to your Tailwind Communities.
one thing that can change the way you work
Usually you create your pins and social media posts while you're creating all your content. And then you add them to your post before you publish it.
But if you want to use Tailwind Create to make the pins you're going to use on your content, you'll have to publish the content first.
Not sure this is suitable for everybody. I still prefer creating a couple of social media posts and pin designs with Stencil as I work on my content and then I upload them to my blog posts.
But I do use Tailwind Create to create new Pins for older content or older articles I want to boost.
AN EXTRA BENEFIT OF USING TAILWIND CREATE FOR YOUR AFFILIATE POSTS
Are you one of those people that looks at collage pins on Pinterest and would love to do them but every time you try to do them it doesn't look right? Or you spend so much time creating them it's not worth it to you?
Tailwind Create has some templates where you can add multiple images, not enough for a full collage with tens of products, if that's what you want, but 3 or 4 images that can help you create curiosity and make more people click on your pin to see the rest.
I've tried them with a couple of profiles and these pins seem to do really well.
And since Tailwind Create grabs your images directly from the URL, it takes just a minute to create several pins showcasing different products.
SUPER IMPORTANT TIP!
Make sure you're allowed to use the images for your affiliate products before you add them to your pins.
how much does tailwind create cost?
You can use Tailwind Create for FREE with Tailwind's FREE Plan. You can create up to 20 social media posts with it, but this is not enough if you're going to use it for all your social media and you want to create several pins for each of your blog posts.
But with Tailwind's PRO plan (currently costing $9.99 per month if you pay annually) you can design up to 200 social media posts.
You can only schedule up to 100 posts per month with the PRO plan, between Instagram and Pinterest posts, though, but if you're already using a different social media scheduler, you download your designs and use them on other social media or add them to your blog with Tasty Pins.
Tailwind Create Vs Canva
So you've been using Canva to create all your graphics and you love it.
To be honest, so do I, but how does Tailwind Create fare if you compare it to Canva?
There are three things where Tailwind Create is better than Canva.
But if you still use Canva to create videos, animations and other graphics, you'll probably still want to stick with them.
tailwind create pros and cons
Pros
Cons
ConClusion
Tailwind Create is a great tool to add to your blogger's toolbox to help you with your social media management, and it's a great time saver when you're designing Pins and other social media posts.
I love using it to create FRESH pins and other social media graphics for older blog content but don't use it that much for brand new blog posts.
And I love to experiment with designs and colours I wouldn't usually go for and see what happens with those pins.
If you still need to create other types of graphic, though, you will still need to use another tool.
It's really good for people without good design skills or who don't have the time to create multiple designs and need a seamless way to create and schedule pins (and other social media posts).
Ready to Try Tailwind Create? Start using Tailwind for FREE here!


